I wanted to host my Django apps on Bluehost, but there was no out of the box solution that I could find. I pieced together a temporary solution using an older release of Django from various sources.
Check out my other Django guides!
- Hosting Your Django App on Heroku
- Django, A Framework for Python Web Apps
- More Nuts and Bolts of a Django App
1. Set up SSH for your Bluehost account
Check out SSH and SCP: Howto, tips & tricks over at the Linux Academy Blog for more details on SSH and SCP.
- Search 'ssh' from cpanel to access the ssh console
- Generate pub/private key pair on Bluehost, then download the private key and put in ~/.ssh (this seems backward, but for some reason, Bluehost insists on having both keys on their server)
- `ssh bluehostusername@bluehosturl`
2. Install python
|
|
Where homeX/your_username is your home path
You’ll also want to rename python27/bin/python2.7 to python27
NOTE: ./configure will check dependencies and other info about your system to ensure the software will install correctly. It will also generate a makefile to be used by the make command.
3. Install setuptools and pip
|
|
3.5. Install Your Database of Choice (default is sqlite3)
|
|
4. Install Django 1.8 and flup 1.0.3
|
|
NOTE: pip install Django will install Django 1.10, which does not have fastcgi.
If you are getting a 500 error because you installed Django 1.10, you can run the .fcgi file to see the Python error:
|
|
Perform the an uninstall and reinstall with a target version of Django to resolve the error:
|
|
If you installed the latest version of flup, you’ll get the error:
|
|
Again, perform an uninstall and target a specific version of flup:
|
|
5. Create myapp.fcgi
|
|
chmod myapp.fcgi
|
|
6. Create .htaccess
|
|
That should do it. When you hit your URL you should see a page not found error (this is good! There is no URL set up to point to the index, so a 404 is expected).
|
|
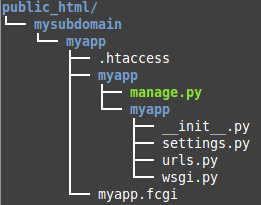
My File Tree
I have my project set up as a subdomain on my Bluehost account, but the process is the same if you are interested in using your main URL. Simply put the project directory at the root of public_html (i.e. public_html/myapp). Your URL would be maindomain/myapp.
My url here would be mysubdomain/myapp

Converting From fastcgi to wsgi
This works fine for Django 1.8, but what if we want to use the latest and greatest?
Well, fastcgi is no longer part of Django as of Django 1.9, because of lack of flup maintenance.
So ideally, we would convert to wsgi (which is what is used by Heroku, etc, anyway).
Here’s a starting point.
More on this once I’ve gotten it working!
Sources
I ran across a couple posts from a few years back detailing how to make it happen, but ran into issues because I didn’t specify older versions of things.
Python 2.7 + Django 1.4 on Bluehost
The main problem I ran into with this post was that it used older versions, so we have to specify these older versions when install Django and flup. Another minor point is the order of operations when creating the directory and the project. The project needs to be created inside the folder in public_html. (You can always move the project if you’ve created the project before the directory).
Tutorial: Installing Django on Shared Hosting Service Such as Bluehost.com
This one has some code formatting issues, so beware the copy pasta.
Bluehost’s Django troubleshooting page
This helped me to troubleshoot the error by pointing out that the .fcgi file can be executed manually from CLI.
StackOverflow, helpful as always
This post indicated I was using the wrong version of flup.
(Disclosure: I am a Bluehost affiliate and will receive a commission for purchases made through this link.)
