Table of Contents
- Required Packages
- Installing WordPress
- Setting Up the Database
- Setting Up NGINX (Your Traffic Controller)
- Modifying the Default Site Settings
- Mapping Your WordPress Install to Your NGINX Server
- Setting Up DNS (Domain Name Server)
- NGINX Server Matching and You: Server Lists and the Catchall Server
- Additional WordPress Installs
- A Parting Anecdote
Required Packages
You’ll need these packages installed on your Linux server to complete this tutorial.
- php
- php-mysql
- mysql
- nginx
Installing WordPress
Use wget to download WordPress. If you don’t have access to sudo on your server, you can download the file locally and use scp or a file manager to upload it to your server instead.
|
|
For each WordPress install, create a directory with your site’s domain name at /var/www. Create an html directory within your site’s domain directory.
|
|
Now, unzip the latest.tar.gz file and copy the files to the /html directory.
|
|
To ensure everything runs smoothly, change the owner of the directory to www-data (the -R changes ownership recursively).
|
|
Your WordPress install is now ready to be configured; let’s wire up the other components we’ll need.
Setting Up the Database
Connect to your mysql instance as root (or a user with admin privileges):
|
|
Create the new database:
|
|
Create the user, then grant it all privileges to its respective database:
|
|
That’s all we need to do with mysql for now; we’ll connect our site to its database once the nginx server configuration is completed.
Setting Up NGINX (Your Traffic Controller)
Nginx basic file architecture
/etc/init.d/nginx: Service controllersudo /etc/init.d/nginx startstarts the serversudo /etc/init.d/nginx stopstops the serversudo /etc/init.d/nginx restartrestarts the server
/etc/nginx/nginx.conf: Base configuration/etc/nginx/sites-available: Site configuration files (virtual hosts)- Files in this dir are symlinked to
/etc/nginx/sites-enabled - When the nginx process is started,
nginx.conftells nginx to slurp up all the files in/etc/nginx/sites-enabledwith this instruction:include /etc/nginx/sites-enabled/*;
- Files in this dir are symlinked to
/etc/nginx/conf.d: Additional configuration files- Similarly to
sites-available, files in this dir will get loaded at nginx process runtime, with this instruction in the base configuration file:include /etc/nginx/conf.d/*.conf; - The minor difference is that only files with
.confendings will be loaded - We won’t be using these files in this configuration
- Similarly to
/etc/nginx/mime.types: Mime type (identifiable file formats) configuration- These are loaded at nginx runtime by this instruction in the base configuration:
include /etc/nginx/mime.types;
- These are loaded at nginx runtime by this instruction in the base configuration:
Install and Test NGINX
|
|
You could fire up the nginx process right away with the default server settings in /etc/nginx/sites-available/default, but all you would see is the nginx confirmation page. If you have apache running on the same port (default is 80), you will receive an error, so be sure to shut that down first with a sudo /etc/init.d/apachectl stop or just sudo apachectl stop.
Go ahead and fire up the server and navigate to localhost or 127.0.0.1 in your web browser, or do a quick curl from the command line:
|
|
You should be seeing the default welcome document which is stored at /var/www/html/index.nginx-debian.html.
How does nginx find this file?
If you look at the default server settings in /etc/nginx/sites-available/default, you might notice that the root setting is pointing to the default html directory: /var/www/html. You also might notice that index.nginx-debian.html is in the index list. This list gets loaded in order. That means if you add your own HTML doc index.html (you’ll likely need to be root to add a file to /var/www/html), that will load instead. Try it out!
|
|
Modifying the Default Site Settings
Let’s dig into the default settings file.
|
|
What is all that stuff? Let’s prune it up a bit.
First, make a backup in case things go awry. This is always a good practice when changing any configuration file.
|
|
Now we can get down to business removing the parts we don’t need (or (#default-nginx-config">jump to the pruned-up version]).
Get rid of the comments at the top and the comments regarding SSL (we don’t need to worry about that for now).
Add index.php to the front of the index list as indicated by the comment, and delete the last two entries (don’t delete the semicolon!)
|
|
Update the location / section to handle PHP:
|
|
Uncomment the location ~ \.php$ section. Delete the line that ends with :9000.
Delete the .htaccess; we won’t be using apache at all.
Delete the virtual hosts section at the bottom; we’ll get to that later.
Your default file should now look like this:
|
|
That’s better, but it’s still pointing to the default /var/www/html, and we want it to load our WordPress installation.
Mapping Your WordPress Install to Your NGINX Server
First, let’s get rid of the default symlink /etc/nginx/sites-enabled/default. Don’t worry, the configuration file will remain untouched in /etc/nginx/sites-available.
|
|
Next, make a copy of /etc/nginx/sites-available/default. You can name it whatever you want, but I recommend using your domain name.
|
|
Now, make a symlink to sites-enabled and restart your nginx server.
|
|
You should see the exact same 'Hello world!' page as before when you curl or visit localhost in your browser.
Now it’s time to wire up the WordPress directory. Simply change the root directory to /var/www/my-first-site.com/html.
|
|
Now when you navigate to localhost with your browser you should see the WordPress setup page, prompting you to select a language.
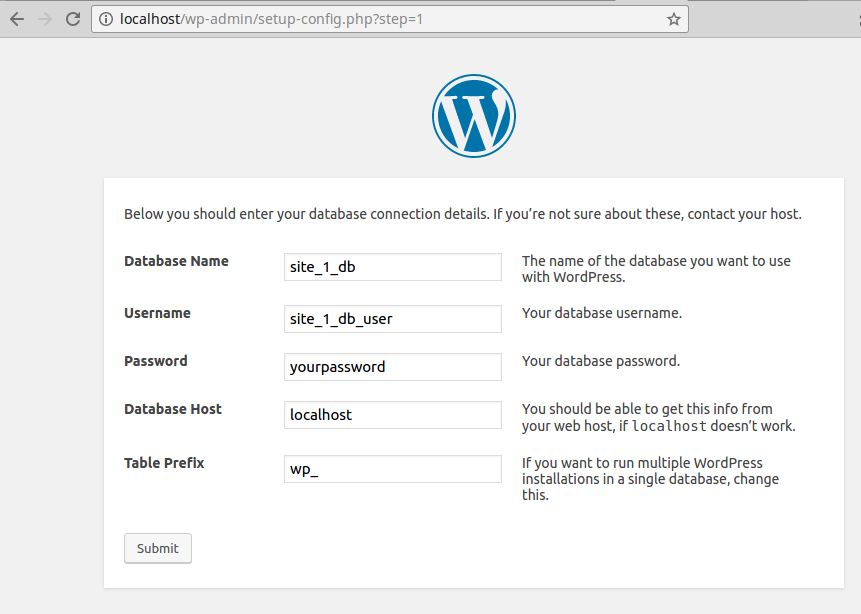
The next page will prompt you for the database credentials you created earlier. The WordPress installer will test the connection, and then you can proceed with setting up your site.
Troubleshooting: PHP Processing Errors
If you see raw PHP code when you navigate to localhost, you’ll need to update your nginx MIME types.
|
|
Insert the text/php type at the top of the list like so:
|
|
Troubleshooting: Possible Missing Packages
If you get a 404 or a 502, you may be missing some required packages. If you’re using a Digital Ocean droplet and you selected a WordPress install when you created the droplet, these are taken care of for you. If you’re rolling your own server setup, you’ll need to install php and the php-mysql extension.
|
|
Once you’re done with your WordPress setup, it’s time to inflict your site upon the world. To do that, you’ll need to setup your domain’s DNS records.
Setting Up DNS (Domain Name Server)
You’ll want to have (at least) 2 DNS records for each of your sites. Log in to your DNS manager and create one A record and one CNAME record for each site. The A record should point to the same public IP address (your server’s).
Click here for Nameserver instructions
Once your records are configured properly to point to your host IP, you should be able to access your site via your domain name.
NGINX Server Matching and You: Server Lists and the Catchall Server
“But wait, we didn’t update the server list in the my-first-site.com file. How does it load my WordPress files for both localhost and my domain name/public IP?”
Glad you asked! The matching magic occurs in the first lines of the my-first-site.com file.
|
|
This server is matched by any incoming traffic on port 80. In fact, 'listen 80' is actually shorthand for 'listen *:80': any traffic coming in on port 80 (the default HTTP connection port). But how? What does server_name _; do?
First, nginx looks for all available servers. Then it tries to match the HOST_NAME given in the HTTP request to the servers list. In this case, it tries to match localhost, your domain name, or your public IP to _, which fails.
So why does it still load your site? Because there is only one server defined, and nginx is super generous. When it doesn’t find a match, nginx will serve up the first site it can find. So the last-loaded site is the site that gets served when no hosts are matched (unless a default_server is defined, then that will get loaded when no matches are found). That’s super helpful of nginx, isn’t it?
To protect against inappropriate or accidental serves, you’ll want to define a catchall server. Let’s take care of that before we get our second WordPress site rolling.
Configuring the catchall Virtual Host
Create a new configuration file in sites-available:
|
|
Add these contents to catchall:
|
|
Don’t forget to symlink the catchall server config to sites-enabled:
|
|
That’s it (almost)! We’ve used a zero-length string as the server name, but something like the default _ would work just as well. Basically you want the file with the default_server setting to never match any HOST_NAME. When nginx can’t find a match in any of it’s known servers, it will load the server flagged as the default_server. In our case, it will load the index.html file at /var/www/html, so put something snarky there for anyone trying to direct traffic to your public IP. At least provide some entertainment since they would have gone to all the trouble.
If you restart your nginx server now, you will get an error:
|
|
Take a look at the journalctl log to see what the problem is (spoiler alert: we have multiple default servers defined):
|
|
Updating my-first-site.com
Open up your my-first-site.com configuration file and remove default_server from the listen line:
|
|
While we’re at it, let’s add our domain name to the server_name list. You’ll want to add two items, one to match my-first-site.com exactly, and another to match anything prefixed to the domain name, like the www CNAME record or a sub-domain:
|
|
That’s it!
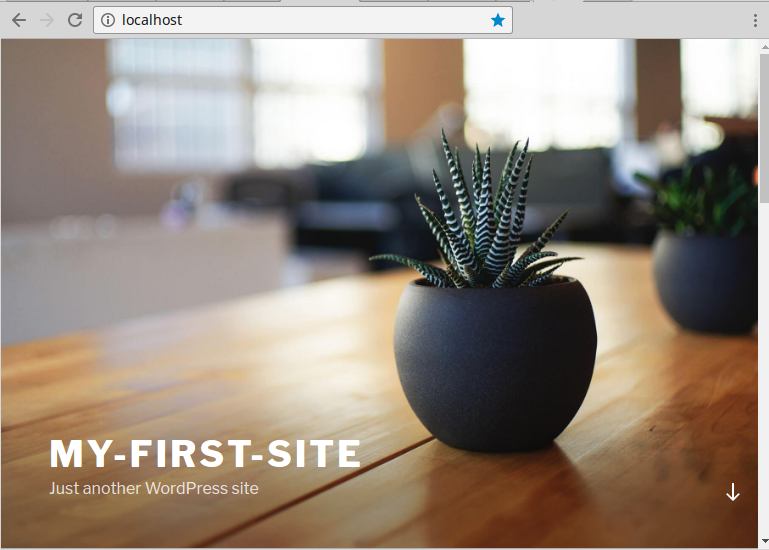
Now you can start your nginx server and bask in the sweet, sweet glow of your default WordPress theme (mine has a very soothing image of a potted succulent).
Additional WordPress Installs
At this point, all of the pieces are in place. For additional WordPress installs, you’ll simply need to repeat the steps above for my-second-site.com, and so on:
- Set up the WordPress install at
/var/www/my-second-site.com/html - Set up a new database and database user (or you could use the same database with a different table prefix, but why tempt fate?)
- Copy
/etc/nginx/sites-available/my-first-site.comto/etc/nginx/sites-available/my-second-site.com- Change the
server_namelist and therootlist to matchmy-second-site.com
- Change the
- Restart your nginx server
- Set up your DNS for
my-second-site.com(Note: You don’t actually have to have a second domain; you could create a sub-domain onmy-first-site.comand simply point the second virtual server configuration’sserver_nameto that sub-domain! Just be sure to modify the*.my-first-site.comserver_listentry first, of course.) - Navigate to your new WordPress install and go through the configuration steps.
- (Required) Put two browser windows side-by-side, with one site in each, and bask in the glow of dual succulents!
A Parting Anecdote
Or “How a semicolon forced me to gain a deeper understanding of nginx than I probably needed”
I was having problems setting up multiple virtual hosts with nginx.
The site configuration was set up appropriately (I thought) for two separate domains in sites_enabled, but nginx was only serving up one or the other site.
By toggling default_server in first one file, then the other, I verified nginx was able to load both root locations.
To facilitate troubleshooting, I stripped the virtual server files down to barebones: no WordPress loading, just a simple index.html telling me which root location was loading. If I set site1 to default_server, that configuration’s root location would load for both domain names, and vice versa.
After pounding my head against this problem for hours, digging into nginx documentation, and reading tutorials on multiple-site setups, I still couldn’t find what was causing the problem.
It was clear that I was experiencing the nginx generosity that we discussed above: nothing was being matched, so it was serving up the default_site instead. I just couldn’t figure out why.
Finally, I started tweaking the order of definitions in the sites-available configuration, and restarting the nginx service with each tweak.
Lo! When I moved the server_name list above the index list, the nginx service failed to start, and journalctl had this to say for itself:
|
|
Aha! A missing semicolon at the end of the index list! I added the semicolon and all was right with the world.